Thursday 25 October 2012

Watersoluble Crayons - Perfect for Autumn Leaves!


In a few days’ time, here in the UK, we will be putting our clocks back an hour as we come to the end of BST – British Summer Time.

Not that it’s been much of a summer and the little there was of it seemed to give way to autumn very easily and promptly this year! And even the autumn has been wetter than usual, with fewer than usual bright, crisp days to show off the changing colours of the trees in all their glory. The usual ‘carpets of gold’ have been replaced this year with something rather more soggy and mostly less colourful.

But there have been a few of those ‘golden’ October days, though I’ve never happened to be out with my camera on those days.

So one day recently, when I was waiting for some paint to dry on an illustration I’m working on, I suddenly had the idea of getting out my watersoluble crayons and creating some autumn colours for myself.


It really was a case of ‘mucking around’ and only took a few minutes. I’ve had these wonderful crayons for some months now but never had time to really explore their possibilities.  On this occasion, I loved the way I could add water to some parts to make a smooth wash, while leaving other parts in their original, raw, crayon-like state!

After scanning and cleaning up, I used Photoshop to make a 'half-drop' repeat template from them -

- which I then repeated over and over again to make a basic pattern.

By making the white parts transparent, it was easy to try out different background colours. I started with my usual favourite deep blue that I often seem to use in conjunction with orange. But then I became a bit bolder - after all, when you are working digitally, there's no expensive paper or paint to waste!!

Perhaps surprisingly, this one turned out to be one of my favourites -


Next it was time to create some coordinating patterns.
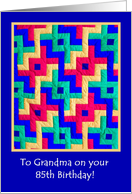
Instead of the summer-y check ginghams I've been making to go with some of my flowery patterns, I felt that a  houndstooth check would be more appropriate; warm and woolly for those days when there was a definite autumnal chill in the air.


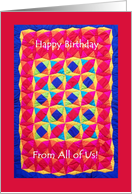
And then, by this time firmly in experimental mode, I went on to have great fun with this rather more complex than usual stripe!

And finally, the real fun bit - putting together all the patterns that resulted from that first quick 'scribble' with the watersoluble crayons -

I could have gone on and on - adding a matching polka dot pattern or some conventional stripes - where does one stop?

What has really surprised me is how easily the handpainted and the digital elements work together! I rather doubt whether I'll ever be tempted to create a pattern entirely on the computer. But even with the rather meagre level of digital knowledge I possess, clever computer programs can open doors to pattern developments that would be practically impossible by hand.

Can't help wondering, though, whether William Morris's patterns would have been any different if he'd had a computer!


Thursday 18 October 2012

Patchwork - Pretty and Practical!


These remind me of the fabrics I used for my daughter's dresses when she was a toddler!

I’ve just finished making ‘Presentation Boards’ from all the design motifs that arose from the first Module of the Art and Business of Surface Pattern Design course.

I hoped that by putting them all together on a Pinterest Board, some sort of ‘Signature Style’ would immediately jump out at me. Alas, it didn’t – but I can identify two main styles in the patterns I’ve created so far and they're just about as equal in number as they are different from one another!

There’s my bold, bright, colourful style, often based some collage I’ve made.

Another one based on the 'postcard' stripes I made in Week 1!


And then there’s what I’d describe as my ‘Granny Print’ style – pretty mini-prints, ditsy florals, reminiscent of the fabrics I used to make my daughter’s dresses in the late Sixties, obviously unintentionally influenced by Laura Ashley.

At the opposite extreme in terms of boldness, brightness and colourfulness!

Laura Ashley swatches - from the archive

Of course, there were a lot of scraps left over from these sewing sprees. I don’t remember where I got the idea – maybe from a BBC programme about quilting and its power to relieve stress - but I used my leftover snippets to make patchwork in the Seventies.

I made cushions and tea-cosies and an outsizzed pocket on a plain apron. But most of all I made little pram quilts for friends who were just getting around to having their second and third babies!I have some photos of them somewhere, but at the moment they are eluding me. They were not unlike these New Baby Congratulations Cards, except that they had a frill of white broderie anglaise all around the edges and the hexagons were tiny!


Later, in the Nineties, when the grandchildren started to arrive, I again got out my patchwork! But this time I made larger cot-quilts that could also double as a play-mat. And I based most of my designs on Islamic patterns and used bright, full chroma colours!

            
These are photos of two of the quilts


Since I started sketching/doodling in the evenings I haven’t had time to make patchwork by hand. The last quilt I made was in the winter of 1997-98, when I had just moved to Hereford. The Victorian terraced house I bought needed a huge amount of drastic ‘refurbishment’ and until the builders had finished, I couldn’t unpack much. So, although the house did have a functioning heating system, it had skirting board radiators and they were behind all my boxes so it wasn’t worth turning the heating on just to heat my boxes!

 
I managed to get at a box containing fabric remnants and I started a full-sized quilt for my bed. As the evenings grew colder, the gradually growing quilt kept me warm as I sewed, and I didn’t need much heating, proving that the art and craft of patchwork and quilting is truly a way to save money, in more ways than one!

This door curtain that I made with the sewing machine more recently, didn’t save me money, apart from hopefully saving on the fuel bills by keeping out some of the draughts!

I bought most of the fabrics rather than using up scraps because I couldn’t find one fabric that had all the colours I wanted for my curtain. It took me much longer to make than I expected and it didn’t keep me warm in the evenings. As for being a stress-reliever, I think it was the opposite – trying to get all the corners to lie flat, using the sewing machine wasn’t easy!

But I’m pleased with the way it solved the problem of combining all the colours I wanted!


Patchwork to the rescue again!


Wednesday 10 October 2012

From Stripes to a Luscious Summer Fruits Pattern


It’s officially the break between modules of ‘The Art and Business of Surface Pattern Design’.

But this week our course tutor, Rachael Taylor, has put out a call for Module 1 'graduates’ to submit their favourite pattern to showcase on her blog.

I’ve been beavering away, producing a new pattern and its co-ordinating designs almost daily because I have so many sketches and even finished painted or screenprinted motifs, queuing up to be made into patterns. So I have plenty to choose from!

You can see them
 on a
 Pinterest Board

But it didn’t take me long to decide which one to submit. It was the one I had most fun working with – or maybe that should read ‘playing with’!


This was the postcard-sized pattern I made in the very first week of the course and it wasn’t compulsory, just a suggestion for those of us who couldn’t wait to get on with designing. It was suggested that we use tapes or ribbons to make stripes but I couldn’t find my box of tapes and braids. I haven’t had time for any sewing for a while and my sewing things are stacked in a corner or my attic studio, and not easy to get at.

My collage painted papers, on the other hand, were easily accessible!

So how did I get from these simple stripes of painted tissue to the ‘Summer Fruits’ idea of the pattern that I'll be submitting? 


To be honest I’m not entirely sure – often a title or theme will suggest itself to me as I’m working/playing with a design and I can’t get it out of my head until I consciously acknowledge its presence! This was one of those themes.

But I think the sequence of thoughts went something like this –

Bright, warm-coloured stripes > summer > outdoors > garden > canvas garden furniture > stripey awnings > garden party > Edwardian picnics > strawberries and cream > Pimms with slices of orange and lime . . . plus the colours in the original stripes are quite 'fruity'.

To me it has overtones of a bye-gone era, the luxurious garden entertaining of the ‘upper classes’ of a century ago, as portrayed in some of the very popular TV dramas!

But, in spite of that, I don’t think the finished pattern has a particularly ‘vintage’ look. What do you think? 


Thursday 4 October 2012

How to Redecorate your Home - without leaving your desk!


The first module of the ‘Art and Business of Surface Pattern Design’ ended last weekend and I really should be catching up with things I neglected during the five weeks of Module 1.

But . . . I’m afraid I’ve become so addicted to pattern-making that it’s hard to tear myself away from my computer. I kind of justify the time I’m spending by telling myself that I’m practising what I’ve learnt to do in Photoshop. And to some extent that’s true.

I still find Photoshop quite baffling at times but at least nowadays, if it refuses to do what I want it to, I can come up with a few solutions and usually one of them will work. That is definitely progress!

We were kept particularly busy for the last ten days or so of the course, with 'creative exercises' and ‘design briefs’ coming thick and fast. Somewhere amongst all that, it was suggested that we should try putting our designs on walls, curtains and other surfaces – virtually, of course - with minimal instructions about how to do it and the promise of further instruction at a later date.

So, just for fun, here are some of the patterns I’ve designed, applied to the 'surfaces' of my home!

First of all, my bedroom - 

I really haven’t got to grips with how to get the scale of the pattern right for this Photoshopping exercise. At the scale I intended, most of these would appear totally different, more like mini-prints. As they stand, they’re rather too bright and bold for my liking as wallpaper, though some of them could be OK at that size for curtains perhaps.


 I think huge nasturtiums on one wall and sunflowers on another would probably keep me awake at night!

 The landing - above the dado - oh dear!

It gets worse - the roller blind in the little back bedroom!!!


. . . and even worse!

This one is slightly more in keeping with my Edwardian home!


Lastly, my Guest Bedroom -


And of course, I've kept the best for last!


Intended as curtain fabric for a child's bedroom, I don't think my adult guests would appreciate Little Green Froggies peeping over the bedhead at them!

I hope you've enjoyed this little excursion into the realms of silliness! 

But the serious question of identifying my 'Signature Style' remains. 

I'm working through all the pattern ideas I came up with during the course, making coordinating patterns and pinning the finished 'presentation boards' onto a Pinterest Board HERE.

So far I still haven't been able to see a common thread, or even think of a single word that could link the patterns I've created so far. Any ideas will be greatly appreciated!