
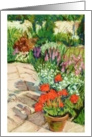
I love having fun creating greeting card designs in collage, pen and wash, watercolours and even oil pastels but when I think of my ‘proper’ paintings, there’s only one medium for me – soft pastels.
The paintings that I’ve exhibited and sold have all been in soft pastels and such is my addiction to the medium that, if I’m particularly busy, I daren’t begin a soft pastel painting. A few years ago, one Thursday, I decided to have a ‘painting day’ – and when I finally stopped at the end of the following Monday, I’d completed seventeen paintings!
People have often told me that they wish they could use pastels like I do and I’ve been asked to teach classes or give demonstrations in soft pastel painting. But I’ve always ignored such requests because all I could think of to teach was, ‘get a set of pastels and some pastel paper, pick up a pastel and do it!’ Hardly likely to fill even an hour’s lesson, let alone a course of lessons!
I really do think it’s that simple and it’s precisely because it’s so simple that it’s the medium that allows me to get into ‘flow’ very easily. There’s nothing to interrupt the 'flow' - no mixing washes, no stopping to dip the brush in the paint, not to mention the washing the brush out and waiting for paint to dry! You can simply create in one continuous stream and if you set out your pastels so that you can remember more or less where each colour is without looking, you don’t even need to take your eyes off your painting!
I’m very doubtful that much art can actually be taught but I don’t want to give the impression that I’m withholding ‘trade secrets’ so I’m wondering whether it might be useful to simply describe how I came to start using soft pastels. It would be wonderful if, as a result, even just one person felt inspired enough to have a go and discovered the unique qualities of the medium for themselves!
I began to use soft pastels in a Life Drawing class and the following series of photos – old non-digital ones I’m afraid! – illustrates the path that lead me to them:
1. I’ve always loved using charcoal; the feel of it on the paper, the variety of marks you can make with it. And it seemed like the obvious choice for the often rapid sketches we were asked to make in the Life Class. A twenty minute time limit was quite common, reducing to 2 minute sketches and even sketching a model dancing! So a large pad of cheap layout paper and charcoal in a variety of thicknesses was ideal for these exercises!

(Yes, I know, the anatomy looks decidely weird but it's the only pure charcoal Life Drawing I could find!)
2. Then, as my confidence grew, I moved on to grey sugar paper and added white chalk for the highlights.

3. From there it was an easy and logical step to add a little more colour – the windows in the studio that looked out directly onto the River Wensum were always filthy so didn’t let much light in and thankfully, our tutor was unwilling to turn on the fluorescents. But sometimes the lighting effects were quite interesting!


Have I made ‘painting with pastels’ sound simple? I do hope I have!
There are plenty of ‘how to’ books with instructions about ‘cross-hatching’, blending colours and so on, but you really don’t need them! Soft pastel is such a ‘forgiving’ medium that if you don’t like something you’ve done, you can nearly always whisk the offending part away with a small brush! It's quick, too, because the drawing and painting stages are rolled into one. Most of my pastel paintings take about 45 mins from start to finish.
All you need is:
1. A set of soft pastels – some are softer than others so, if possible, try various brands in the shop before buying. You won’t necessarily enjoy the most expensive ones any more than the cheaper ones – I don’t!
2. Some good, heavyweight pastel paper with a bit of grain – though you might like to experiment with sugar paper to begin with if money is tight!
3. Some sort of little brush – I use a stippling brush – to whisk away unwanted colour without rubbing it into the paper.
4. A can of cheap hairspray – fixing soft pastels inevitably darkens their colours and artists have been known to give up using them because of this. The way I deal with this – and maybe this is my ‘trade secret’? – is to spray the painting when it’s almost finished and then, while the spray is still damp, carry on painting till it’s finished.
5. Plenty of old clothes and overalls! The directness of painting with soft pastels can lead to such a level of absorbtion that you may not notice that smudges of colour get everywhere! I usually end up with dark blue fingers on my right hand and frequently a woad-coloured face as well!

There really is no 'mystique' about using soft pastels - it's simply drawing in colour and as long as you don't mind the possibility of ending up looking like someone out of 'Braveheart', it's the easiest way I know of to 'get into flow'!
10 comments:
From reading your article, I could sense your passion for it and when I look at your beautiful painting I can see it also.
I tried pastels and they weren't for me so I am doubly impressed by your work, it's very impressive and if you love it that much, you should lose yourself in it more often.
Thank you so much, Carole! All the drawings in my post were at least A2 size so you can see how difficult it has been for me to paint designs that will fit into my A4 scanner, as well as getting used to using paint again! I'm often tempted to go back to my soft pastels but so far, always too many other things to do!
How fitting! I have just finished a pastel dog painting (to commission), despite this I have always had a hard time liking pastels. Such mess, so difficult to fix, even with spray. Plus I always fear I don't actually know how to use them, having never been 'taught'. After rigorously learning techniques in watercolour, I feel there must be more to pastel than just putting it on the paper!! Or perhaps not. Despite my dislike of the medium, I regularly force it on my students, many of who say they don't like it either... but they get such good results! Perhaps I should use it more, it may grow on me...
Hi Michele - maybe I should have warned that using pastels the way that I do is not for anyone who doesn't like getting messy.
Also, that it probably helps to be able to draw reasonably confidently.
As you can see from my examples, I've never been 'taught' to use pastels - I just found myself doing it as a logical progression from using charcoal. Do you actually 'teach' your students to use pastels?
BTW. it's a very 'physical' exercise for me - I stand at the easel or pace about the room!! It's a 'whole-body' effort and I often feel quite exhausted afterwards - in the best possible kind of way!
A wonderful, informational post, Judy! You are a talented and skilled artist. I loved your foreshortened sketches. I learned so much about the medium. Love the glow of light you can achieve. Yes, I am going to try it!
Thanks so much for your help.,
Hi Carol - I hope you will give pastels a try - and post some feedback on your blog about how you get on :)
I used oil pastels when I lived in England. I think I'll have to try some soft pastels to give me more hands on art experience than my digital art gives me.
Hi Jayne - yes, do have a go. I've used oil pastels too but soft pastels are still my favourite. They are both such a 'direct' way of mark-making that it's almost like finger painting; so be prepared to end up looking as if you have woad on your face! Good luck :)
Thanks for writing this, Judy!
I'm glad you enjoyed it, Boriana :)
Post a Comment